
Door Frame Patch Kit Installation Guide
Table of Contents
- Why Choose a Door Frame Patch Kit Over Full Replacement
- Tools for Door Jamb Restoration: What You'll Need
- Step 1: Assess the Damage and Choose Your Patch Kit
- Step 2: Remove Damaged Sections and Prepare the Substrate
- Step 3: Install the Jamb Patch and Secure with Hardware
- Step 4: Finish, Paint, and Weatherproof the Repair
- How to Fix Rotted Door Frames: Wood vs. Steel Differences
- Comparing Commercial Door Frame Repair Methods
- Frequently Asked Questions
Last Updated: September 5, 2026
A rusted or rotted door frame often triggers a costly reflex: full replacement. Yet in most commercial settings, the damage is localized to a few inches of metal or wood. Patching that section restores structural integrity in under an hour at a fraction of the cost.
A door frame patch kit is a pre-formed metal section that splices over the damaged portion of an existing jamb, restoring the frame's original shape and hardware alignment. This guide walks you through the full installation process, from damage assessment to weatherproofing, so your repair holds up for the long term.

Why Choose a Door Frame Patch Kit Over Full Replacement
Full frame replacement means unbolting the frame, prying it from the masonry or drywall, managing disposal, and reinstalling with shims and anchors, typically several hours with the opening unusable. A patch kit keeps the existing frame in place and addresses only the compromised section.
The cost difference is substantial. A commercial steel frame replacement runs several hundred dollars in materials alone before labor (fema.gov). A Jamb Patch Kit from Door Innovation is priced at $130.37 and includes two 4-inch non-handed patches, installation hardware, and instructions.
Patching also preserves the original frame's anchorage to the wall, avoiding alignment problems a re-anchored frame could introduce if the rough opening has shifted.
Tools for Door Jamb Restoration: What You'll Need
Before starting, gather the full tool set to avoid interrupting the job.
- Angle grinder with metal-cutting disc or oscillating multi-tool
- Cold chisel and hammer
- Wire brush or abrasive wheel for rust remediation
- Tape measure and framing square
- Center punch and drill with metal-cutting bits
- Socket wrench set for installation hardware
- Epoxy filler or metal-repair compound
- Sanding block and 80- to 120-grit paper
- Primer, finish coat, and paintbrush
- Exterior-grade caulking and moisture barrier
For wood frames, substitute a handsaw or jigsaw for the grinder. Corroded steel demands the abrasive wheel to expose clean, sound metal before any patch will bond.
Step 1: Assess the Damage and Choose Your Patch Kit
Before you cut anything, determine whether the damage is repairable with a patch kit or whether the frame has lost its structural integrity.
Diagnostic Test 1: The Screwdriver Probe
Press a flathead screwdriver firmly into the most corroded or rotted area with moderate pressure.
- The screwdriver sinks in or flakes material away easily: Active decay. The damage extends deeper than the surface. You must cut out the affected section completely.
- The screwdriver skids across the surface: Surface-level corrosion or rot. You may be able to grind or sand it down and treat the area without a patch.
- The screwdriver bounces back: The material is sound. The damage is likely cosmetic and can be filled and painted.
Diagnostic Test 2: The Flex Test
Grasp the jamb on both sides of the damaged area and try to flex it toward you. If the frame flexes, bows, or feels spongy, the structural anchorage to the wall has been compromised, patching will not restore its strength.
Diagnostic Test 3: The Hardware Alignment Check
Close the door and observe the gap between the door edge and the jamb:
- Uneven gap (wider at the top than the bottom, or vice versa): The frame has shifted or twisted. A patch will not correct this.
- Door rubs or binds at the latch area: The strike side jamb has likely corroded or rotted behind the strike plate, pulling the frame inward.
- Hinge screws strip or pull out: The hinge-side jamb material has decayed behind the hinge pocket. A hinge-side patch with a pre-cut pocket is the correct fix.
When to Patch vs. When to Replace the Entire Frame
Use this decision guide to avoid wasting time and materials:

| Condition | Action |
|---|---|
| Corrosion or rot confined to the bottom 4 inches of the jamb | 4-inch patch kit |
| Damage extends up the strike side or hinge side beyond 6 inches | Taller patch (21-5/8 inch) covering the full hardware zone |
| Damage on both the hinge side and strike side of the same frame | Two patch kits, one for each side |
| Frame has pulled away from the wall or flexes under pressure | Full frame replacement, patching will not restore anchorage |
| Door no longer latches because the frame has twisted | Full frame replacement |
| Rust or rot visible on the header (top) of the frame | Full frame replacement, header damage indicates systemic moisture failure |
| Multiple frames in the same facility show similar damage | Investigate the water source first, then patch after the leak is fixed |
Measuring and Selecting the Correct Patch Configuration
Once you confirm the frame is patchable, measure the damaged span vertically along the jamb. Record the distance from the bottom of the frame to the highest point of visible damage, then add at least 1 inch of clearance above that point for the cut line.
Match the patch to your frame's handing and profile:
- Hinge side: Determine whether your door is left-hand or right-hand swing. Stand on the side of the door that faces you when the door opens toward you. If the hinges are on your left, you need a left-hand hinge patch; if on your right, a right-hand hinge patch. The pre-cut hinge pocket must align with your existing hinge locations, typically a 4-1/2-inch commercial hinge pocket.
- Strike side: The strike side uses a non-handed patch. Measure the distance from the bottom of the frame to the center of the strike plate. Ensure the patch height covers the strike plate opening plus at least 2 inches above and below it.
- Profile match: Standard commercial frames use a 2-inch-wide face with a 4-7/8-inch return. Measure your frame's face width and return depth to confirm compatibility. Door Innovation's Jamb Patch kits match these standard profiles, but always verify against your specific frame manufacturer's dimensions.
Step 2: Remove Damaged Sections and Prepare the Substrate
Cut out the damaged metal entirely, do not patch over corrosion, as it will continue to spread beneath the new steel. Mark a clean cut line at least one inch beyond the visibly corroded area on every side, keeping the cut square and level.
After cutting, remove the jamb base section and any rust scale with a chisel and wire brush. For steel frames, treat the cut edges with a rust-inhibiting primer immediately. For wood frames, cut back to solid wood and apply a wood hardener to the exposed grain.
Level the substrate with a sanding block to flatten any burrs or high spots. The patch must sit flush against the frame surface; gaps compromise the bond and let moisture back in.
Step 3: Install the Jamb Patch and Secure with Hardware
Position the patch over the prepared opening, aligning its edges with your cut line. The patch should overlap the existing frame surface, not sit inside the cutout. For hinge-side patches, verify the hinge pocket lines up before drilling any holes.
Clamp the patch in place and check for level and plumb. Drill pilot holes using the patch's pre-drilled holes as a guide, then secure with the included hardware, drawing each fastener down evenly. Do not over-torque; you can distort the patch and throw the door out of alignment.
For steel frames, the patch mechanically fastens to the substrate.
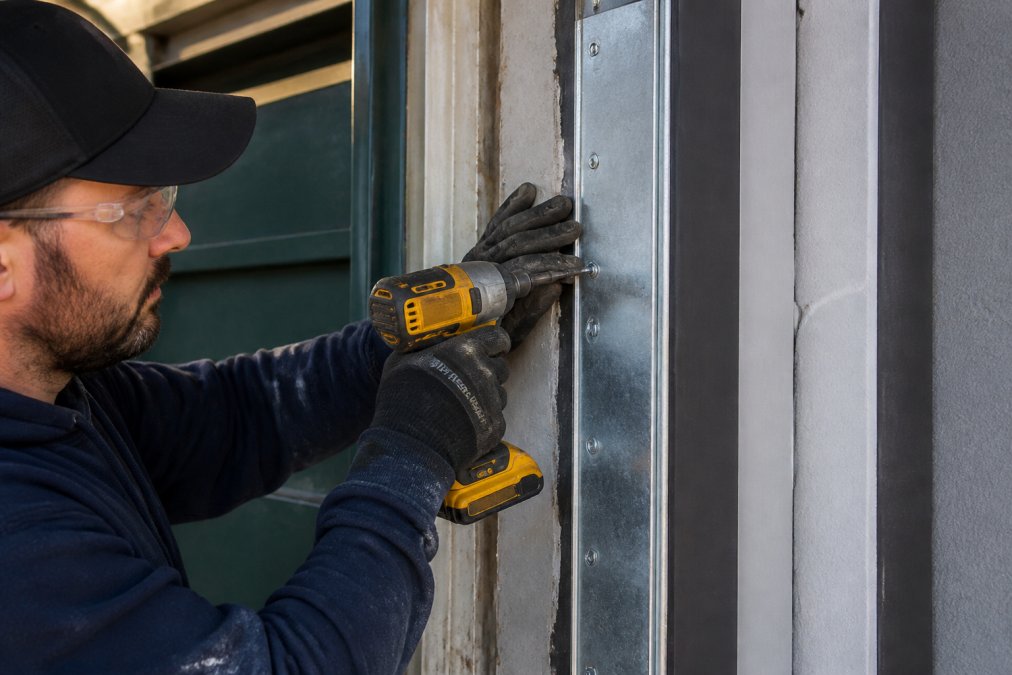
Fill any seams or gaps around the patch edges with epoxy filler or metal-repair compound to restore a continuous surface and prevent moisture from seeping behind the patch. Sand flush once cured.
Step 4: Finish, Paint, and Weatherproof the Repair
Apply a rust-inhibitive primer to the entire patched area, including the filled seams. Once dry, apply a finish coat matched to the existing frame color, two thin coats outperform one heavy coat.
Weatherproofing is the step most installation guides skip, and it is why repairs fail prematurely. Run a bead of exterior-grade caulking along the top and side edges of the patch to create a moisture barrier that stops water from working its way behind the new steel.
Reinstall the door hardware: hinges, strike plate, and weatherstrip. The patch restores the original frame geometry, so the door should close and latch as it did when new. If the door binds, check that the patch face is flush and the hinge fasteners are seated fully.
How to Fix Rotted Door Frames: Wood vs. Steel Differences
The repair logic stays the same across materials, but the execution differs in cutting, bonding, and moisture protection.
For Wood Frames: Cutting and Excavation
Wood rot is a fungal decay that requires complete removal (fs.usda.gov). Use a sharp handsaw, jigsaw, or oscillating multi-tool with a wood-cutting blade, a grinder risks burning the surrounding timber. Cut at least 1 inch beyond the last visible discoloration or soft spot, as rot hyphae often extend further than the surface stain suggests.
After the cut, probe the remaining wood with an awl or flathead screwdriver. If you find soft pockets beyond your cut line, extend the cut until you reach solid material. Treat the exposed end grain with a liquid wood hardener or epoxy consolidant to stabilize any microscopic decay and give the patch screws a sound substrate.
For Wood Frames: Bonding and Fastening
Wood frame patches rely on both mechanical fasteners and adhesive. Apply a generous layer of exterior-grade construction adhesive to the back of the patch to fill minor irregularities and resist seasonal expansion and contraction. Secure with exterior-rated screws, typically #8 or #10 stainless steel or coated deck screws, spaced every 4 to 6 inches along the perimeter.
Fill the seams with a paintable, flexible wood filler or an epoxy-based filler designed for exterior use, standard spackle will crack as the wood moves. Sand flush with an 80-grit block, then follow with 120-grit.
For Steel Frames: Rust Remediation Is Non-Negotiable
Steel corrosion is electrochemical (nist.gov). If any rust remains beneath the patch, it continues to oxidize, producing scale that lifts the patch and compromises the fasteners. The remediation sequence:
- Cut the damaged section with an angle grinder fitted with a metal-cutting disc. Cut at least 1 inch beyond the visible rust bloom.
- Grind the surrounding surface with an abrasive wheel or flap disc until you reach bright, bare metal. Remove all mill scale and pitting.
- Treat the cut edges and exposed substrate with a rust-inhibitive primer within 30 minutes of grinding. Flash rust forms quickly on bare steel, especially in humid environments.
- Fill any deep pitting with a metal-repair epoxy before installing the patch. This creates a smooth, level substrate.
For Steel Frames: Mechanical Fastening and Sealing
The steel patch carries the load through its mechanical fasteners, not adhesive. Position the patch, clamp it, and drill pilot holes using the patch's pre-drilled holes as a guide. Use the included self-tapping sheet metal screws or through-bolts, drawing each down evenly, over-torquing distorts the patch and pulls the frame out of square.
Seal every seam with a paintable, exterior-grade metal caulk or polyurethane sealant to create a continuous moisture barrier. Unlike wood, steel does not breathe, so the seal must be absolute.
Material-Specific Moisture Protection
Wood frames need a breathable barrier. Use a flexible, paintable exterior caulk that moves with the timber. Painting the patch and surrounding wood with a high-quality exterior enamel seals the end grain and prevents future moisture intrusion.
Steel frames need a rigid, non-porous barrier. Epoxy filler or metal-repair compound works best for seams, followed by a rust-inhibitive primer and a urethane or alkyd finish coat. Avoid latex paints over bare steel; they allow moisture migration that leads to hidden corrosion.
Comparing Commercial Door Frame Repair Methods
| Method | Material Cost | Labor Time | Opening Downtime | Best For |
|---|---|---|---|---|
| Full frame replacement | High | 4-6 hours | Full shift or more | Frame damage beyond 50% of structure |
| Jamb Patch Kit (4") | $130.37 | Under 1 hour | Brief | Early rust or corrosion near frame base |
| Strike Side Jamb Patch | $180.91 | 1-2 hours | Brief | Corrosion on the strike plate side |
| Hinge Side Jamb Patch | $180.91 | 1-2 hours | Brief | Corrosion around hinge pockets |
Commercial door frame repair methods fall into two camps: replace the whole assembly or patch the damaged section. Replacement makes sense when the frame has lost structural integrity across most of its height. For localized damage, patching delivers the same result in a fraction of the time.

Facility managers facing dozens of doors with rust issues should think in terms of a maintenance program, not a one-off fix. A single maintenance worker can restore several openings in an afternoon once familiar with the process. Door Innovation supports this with a Become a Certified Installer program.
A properly installed patch, with full rust removal and a sealed moisture barrier, restores the frame to service because it recreates the original structure rather than covering the problem. For healthcare facilities and other settings where safety is non-negotiable, restoring the frame's original geometry means the door closes, latches, and resists forced entry exactly as designed.
Rotted and rusted door frames do not require full replacement in most commercial settings. Assess the damage, cut out the compromised section, and install a door frame patch kit to restore the opening in under two hours. Door Innovation's Jamb Patch kits are engineered for rusted steel and corroded aluminum frames, with pre-cut hinge pockets and non-handed strike options that fit standard commercial profiles. Order your kit today.
Frequently Asked Questions
Should I nail or screw a door frame patch kit?
Always use screws. Nails do not provide the clamping force needed to pull the patch tight against the substrate, and they can loosen over time due to door vibration. The installation hardware included with a door frame patch kit is designed for the specific thickness of commercial steel frames. Use all provided fasteners and drive them fully so the patch sits flush. This prevents movement and keeps the door aligned.
Can you repair a rotted door jamb without replacing the whole frame?
Yes, if the damage is localized and the structural steel or wood behind it is still sound. A door frame patch kit is designed to replace only the corroded or rotted section of the jamb. You cut away the damaged material, treat the substrate, and install the patch. This approach is faster and far less expensive than a full frame replacement, and it preserves the original door alignment.
What tools are needed for a door frame patch kit installation?
You will need an oscillating multi-tool with a metal-cutting blade for steel frames or a saw for wood, a hammer, a screwdriver or drill, a tape measure, a level, a cold chisel, and a grinder with a flap disc for rust removal. You also need safety glasses and gloves. Most installation hardware, including the patch and fasteners, comes with the kit.
Are door frame patch kits compatible with both steel and aluminum frames?
The Jamb Patch kits are designed for steel frames. For corroded aluminum frames, you need a different product, like the Jamb Anchor, which is made for that material. Using a steel patch on an aluminum frame can cause galvanic corrosion. Check the frame material before ordering to ensure you select the correct repair kit for the job.